As any follower of this blog knows, my primary craft is knitting. There are always several projects on needles. I never go anywhere without a portable project—usually socks—just in case. Packing clothes for a trip takes less time than deciding what yarn is going with me. And yet, other crafts sometimes exert a strong pull. I put much of the knitting aside to become absorbed in another kind of project.
At the end of the calendar year over on Instagram, I use the app Best 9 that makes a grid of your year’s nine most popular posts. In the lower right corner of last year’s grid is a photo I took of a long-ago needlepoint project I made for my grandmother Frances. It now hangs in my Auntie Carolyn’s home. I’m fairly confident that was the last needlepoint I did.
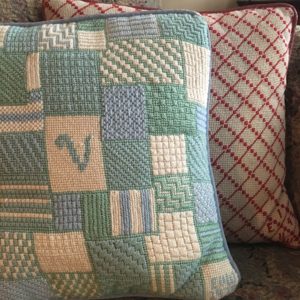

I used to, however, do quite a bit of it. My needlepoint enabler and muse throughout my teens and early adulthood was my Aunt Emily. Among her many fine qualities, she was a needlepointer extraordinaire. I am the fortunate steward of several of her handiworks in my home. They continue to keep me company and inspire me as she did all those years ago.
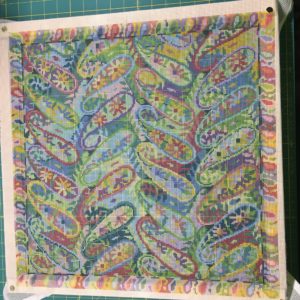
A few months ago, Auntie Carolyn asked me take a look at some needlepoint kits she was considering on the beautiful Ehrman Tapestry website. I was dazzled by their offerings. Reader, I ordered one. And so did she.
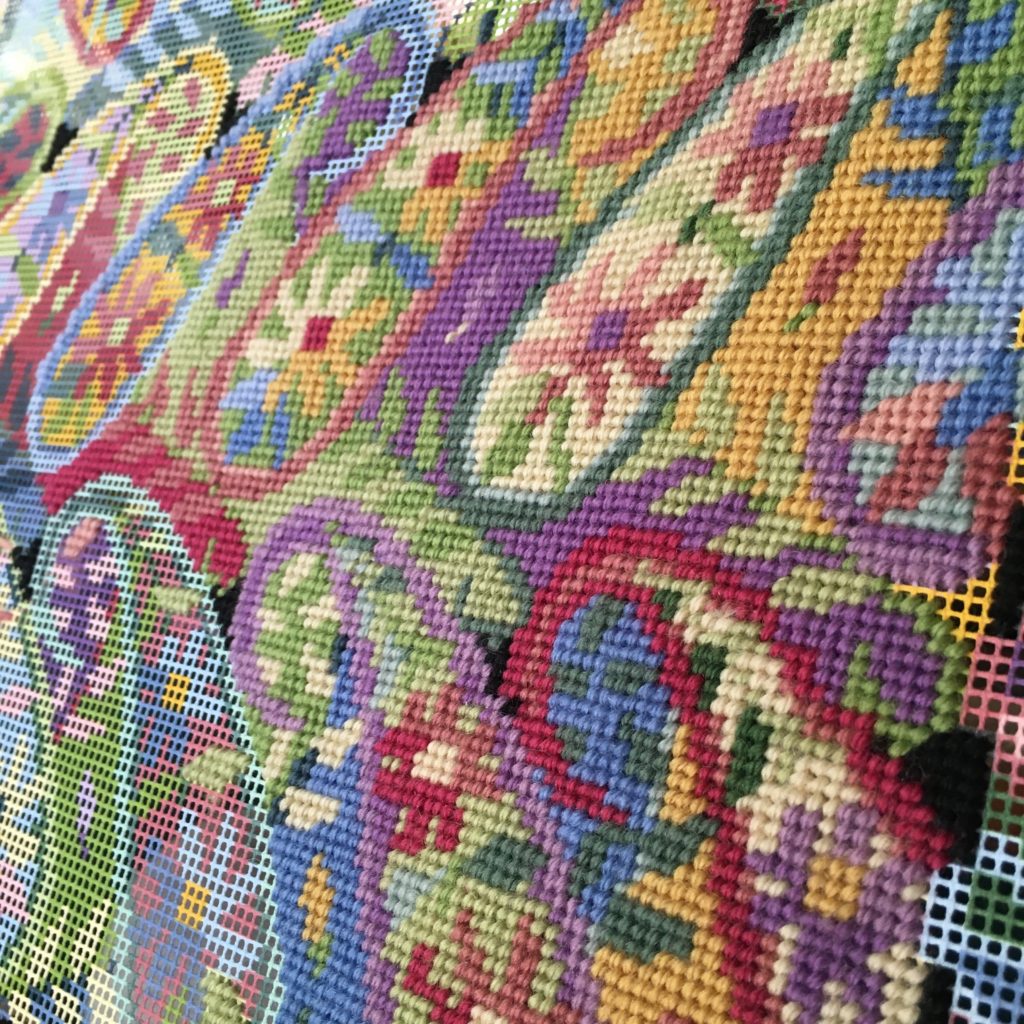
Honest, I measured the dimensions (18” x 18”) and thought, “Wow, that’s big!” But when it arrived and I unfolded the canvas, I was aghast at what I had gotten myself into. (I often roll my eyes at product reviews that complain about something being too big or too small when the dimensions are clearly stated in the description. That’s right up there with the ingredient-substituters—“I didn’t have white wine so I substituted chocolate milk and I didn’t have cheddar cheese so I used up some leftover Chinese takeout and this recipe is terrible! Zero stars!”—in my book.) That said, it seens huge, considering the number of stitches it will take to fill that space.
Preparing the Canvas
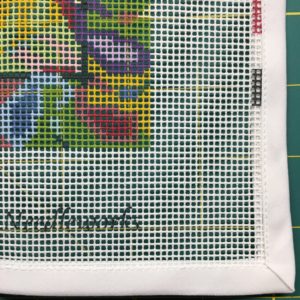
Needlepoint canvas comes in long rolls like fabric.. There are a varying number of holes per inch that accommodate finer or thicker threads or yarns. This kit is 12 holes per inch and uses wool for stitching. Canvas is cut into appropriate sizes for the color pattern stamped on it to to guide the stitching. Along one side of the canvas lies a printed color guide to be cut off and used as a reference during stitching. All this cutting creates jagged edges that can catch the threads when stitching, Covering the edges is the first order of business.
In my younger-more-impatient days, I simply slapped folded masking tape over the edges and got going. It wasn’t all that satisfactory, leaving a sticky residue behind, curling off the edge over time and use, and other issues. I did a little online sleuthing to find that is still one of the recommendations, along with blue painters’ tape but neither of those appealed to me.
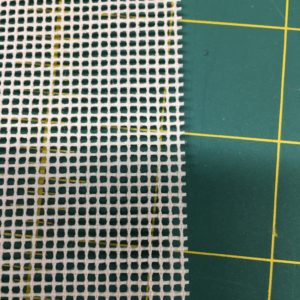
I rummaged through my craft room (Read about transforming my Room of Shame into a craft room here) and came up with an unopened package of bias tape. (Note: The smugness a crafter/maker feels when having just the right bit and/or bob in what others would view as an ungodly amount of “stuff” should not be underestimated. Mine is usually accompanied by a loud “Aha!”) Off to the sewing machine to sew the tape around the edges. Acquiring more patience as I get older, I find great satisfaction in taking extra steps that, even though no one might ultimately see them, make for a more satisfying project. (This is why you will see sewists and other makers exclaim over seams, finishings, and other details. We can’t help it.)
S-T-R-E-T-C-H!
Usually when working any kind of needlework, the fabric being used is stretched taut using some kind of device: embroidery hoop, slate frame, stretcher bars, and framel other options. It is a matter of personal preference, although it might be dictated by the particular project. For hand embroidery, I tend towards the traditional round embroidery hoops. I have some lovely maple ones in different sizes. For this project I opted to use stretcher bars.
After joining the wooden bars at the corners to make the square frame, the canvas stretches across and secured. Starting in the middle of one side and working out to the corners, brass tacks are pushed through the canvas to secure it to the frame. I oriented my tacks on the sides of the frame to avoid problems clamping it into my particular stand (more on that below). When it’s time to stitch to the edges, I’ll untack the canvas and re-position it.
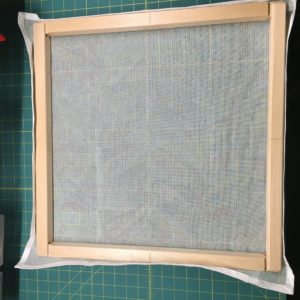
The bars come in pairs of different lengths and thus can assembled in relatively customizable dimensions to suit specific projects. I had 20” x 20” bars for this 18” x 18” final project size. They create a space that is slightly too small to have the entire stitching area accessible, but I thought that any larger would be too awkward to handle.

Organizing the Threads
This kit contains 16 colors, many similar, and they needed to be organized in a reasonable manner. The yarns are 100% wool and lovely quality. (BTW-stitching materials seem to always be referred to as threads, no matter if it’s wool yarn, silk or cotton embroidery floss, or crewel or tapestry yarns). Ehrman packages the threads in multiple bundles, with a guide to the colors identified by name and number. Similar colors are distributed across the bundles to avoid confusion (one hopes!).

Sixteen colors are a lot to keep track of while working so I cut strips of cardstock, punched big holes in them, and looped each color into its own spot, labeling by color number. There are wooden contraptions that do the same out there, but since each project is different, this approach is more flexible. I use undyed cardstock so at the end of it all, it can land in the compost and all’s well.
I worked through these steps for each bundle in turn, to avoid confusing the close colors, until all the threads were organized.
Using the guide, the color card previously cut from the canvas comes into play. Each bundle is separated into individual color groups and a snip of each is tied onto the corresponding color on the canvas. (You would think that it is easy enough to figure out which color is which while working a project. You would be wrong. Ask me how I know.)

Time to Stitch?
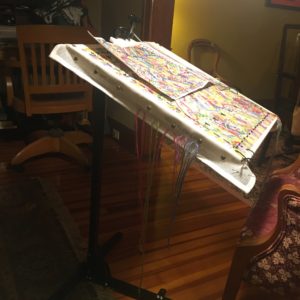
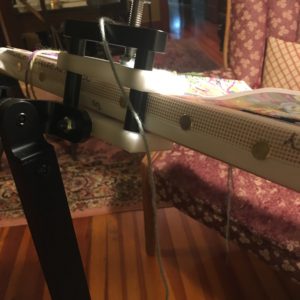
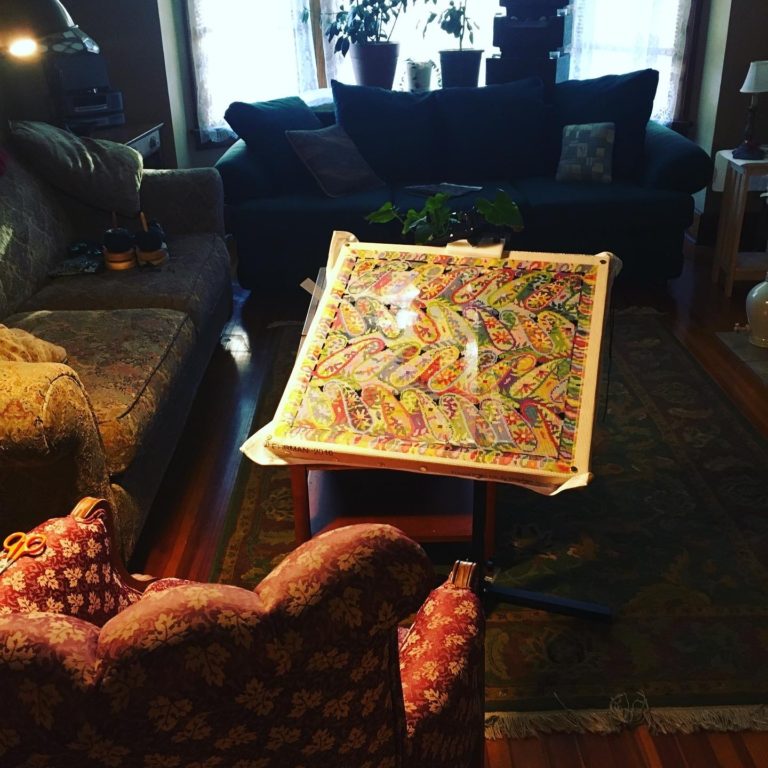
Well, almost time to stitch. Needleworkers hold their projects while stitching, either in a frame or unstretched fabric. I have done that on smaller projects. Totally manageable, but it does mean only one hand can stitch. Some months ago I knew that more needle-and-thread projects were going to be in my future. I decided a stand to hold the frames would make stitching more comfortable.
When I knit, I usually sit cross-legged in a corner of a couch. I can sit that way for hours quite happily (although uncrossing and standing up gets trickier with passing years). It didn’t seem like that would work well for stitching a canvas this large, and that began some exploring among stand options.
There are a number of styles: tabletop, laptop, one that you sit on to stabilize, and floor stands. One of the blogs I follow, Needle ‘n’ Thread by Mary Corbet, is filled with suggestions and reviews of embroidery tools, among her beautiful needlework, tutorials, and all other things embroidery. She reviewed the Needlework System 4 highly and, even though it’s pretty expensive, that’s the one I went for after much deliberation.
It’s pretty simple but very flexible in getting the height and angle of the working surface just right. The leg is a simple T-shape, with the stand support inserted in such a way that it can be positioned from 0 to 90 degrees. A clamp attaches to the top of the support and rotates 360° to further refine the angle at which to work. The clamp I got consists of two rectangular flat plates that grip the stretcher bars (or also my embroidery hoops) firmly by the flat frame edges. It wouldn’t work with a scroll frame with rounded sides, for examples. This system has different clamps to work with the stitcher’s preferred frame type. The clamp also spins smoothly to be able to access the back of the work easily. No matter where the project is positioned, using any of these adjustments, there it stays. Pretty miraculous. It’s not the most aesthetically pleasing piece of equipment. The trade off is that it works so well and makes stitching so comfortable that I’m able to work for longer stretches of time.
Time to Stitch!
Finally.
The kit comes with a color chart of the entire pattern. Each chart square corresponds to a hole in the canvas so that, if it’s hard to tell just from the canvas what the stitch placement and correct color can be, the squares can be counted and the color referenced on the chart. I sandwiched to the chart underneath the clamp for easy reference. I also safety-pinned the canvas color card to a corner so that I can grab that easily to help identify colors as I work along.
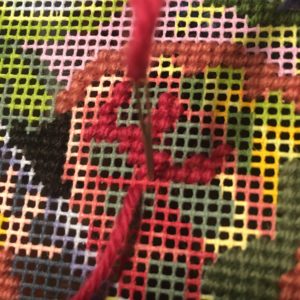

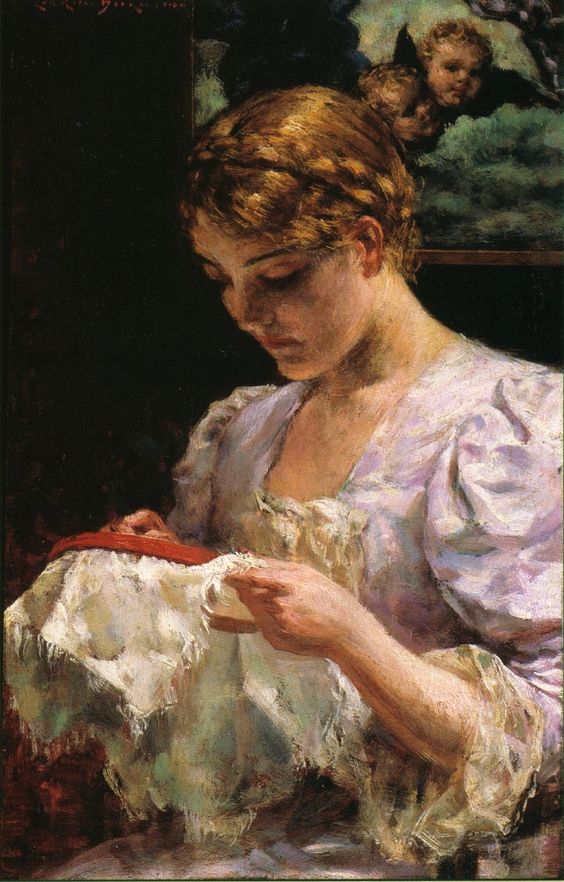
You shouldn’t be surprised to learn that there are hundreds of needlepoint stitch patterns. You can see some examples in the front pillow in the photo of my Aunt Emily’s work above. Because this project is quite detailed—a stitch or two of one color here and there—the whole project is worked in just one simple stitch: the tent or continental stitch. Essentially, the thread is brought up in one hole and then back down through the hole that is 45° and one above, resulting in a small, diagonal stitch crossing over the intersection of one horizontal and one vertical thread of canvas. Two stitches share one hole, completely covering the canvas beneath.
If the canvas is slack enough, the stitch can be worked entirely from the top of the fabric, putting the needle in one hole, angling it underneath to the next one, and bringing it back up again in almost one motion, and known as the sewing method. My canvas is purposely tight, which means I need to work with one hand above and one hand below (another reason the stand is so helpful), known as the stabbing method. I opted for a slower process with a tighter fabric on purpose. An entire canvas of stitches all slanting in one direction will necessarily distort the shape to some degree, which then needs to be blocked back into shape at the end of stitching. Keeping it tight while working helps minimize the amount of work to get it back square and plumb.
One More Tool
This may sound laughable, but when I started stitching it became apparent to me that I needed a new pair of scissors. I had a small pair that I use for sewing and they weren’t really working well. When finishing off a thread, the needle is run through the backs of the stitches to anchor the end, which is cut close to the work. It keeps the back tidy, prevents fuzzy ends from catching on new stitches and showing on the front, and is the usual method of finishing off threads. It’s helpful to get down close and have a smooth cut.
You’ve probably seen the traditional embroidery scissors shaped like a stork even if you weren’t aware that was their purpose. An interesting side note: It is believed that the stork scissors originated as umbilical clamps used by midwives. Some antique ones even have a baby set inside the scissors. Because there can be a lot of waiting during labor, midwives often kept their birthing equipment along with their needlework and would take both to attend to a laboring woman. Over time the clamp evolved into the scissor design associated with needlework.


Back to Needle ‘n’ Thread to look for suggestions for quality scissors and, once again, Mary Corbet pointed me in the right direction: Ernest Wright and Company, producer of handmade scissors in Sheffield, England . They are not inexpensive, but I have a deep appreciation of handmade goods and beautiful well-made tools, so I regard it as an investment in the pleasure of handcrafts. These are beautifully made, packaged, and a delight to use. Sharp, with a satisfying snip, and should last a lifetime of needlework. There is something so satisfying about using the right well-made tool for the job at hand. I tied a length of ribbon through the finger holes and loop them over the top of the stand clamp to keep them handy.
During this time of being housebound, the appeal of immersing myself in needle and thread, in fine detail, has been a welcome relief amidst the chaos of the current world situation. Repetitive movements with my hands become a type of meditation. The motion of the needle soothes. I hope you, too, have found an activity that helps smooth these troubled waters we are sharing.
P.S.
I continue to listen to audiobooks while I ply my needle. You can see what’s been keeping me company here; you might find something that piques your interest. I get mine for free through my local library.
Russell D McDowell
11 Jun 2020Wow, what an education for the ignorant. You do all sorts of research what your craft; I guess that means you take it seriously, which, of course, the quality demonstrates. Yes, listening while doing that detail work–two for the price of one. Anyway, your blog is always a revelation. Thanks.
Handmade Bits and Bobs
31 Jul 2020And to think there are still so many more crafting rabbit holes to fall down! I do always like to know the whys and wherefores; part of my enjoyment.
Doris Hartheimer
21 Apr 2020Interesting bit about the stork scissors. Gran had a pair in her old Singer treadle machine. I don’t think they had the baby, included. I’d remember that. I used to play with them. I wonder where they went. I viewed the Instagram page. Wow! What an abundance of creation and beauty.
Handmade Bits and Bobs
21 Apr 2020Stork scissors have been traditional a traditional needlework accessory but I never knew the back story until recently. I thought that was super interesting. Glad you liked the Instagram display. You know I always keep myself busy!
Joanna
21 Apr 2020Great post. I loled at “Well, almost time to stitch.”
Handmade Bits and Bobs
21 Apr 2020It’s always the way, though, isn’t it? “Okay, ready. Ooops, forgot to do this. Okay, go. Wait, I forgot…”
Joanna
21 Apr 2020Oh totally! First phase, the shopping phase, second, the planning phase, third, working phase. After that is the dormant phase, and then (hopefully!) the finishing phase. Haha. The dormant phase in my craft room could be 1+ years.
Carolyn Hauben
21 Apr 2020What can I say. Beautifully written and makes me anxious to start my own project. So far I’ve not been able to locate my System 4.
Handmade Bits and Bobs
21 Apr 2020You’ll be so happy to get stitching!